Monday 20 March 2017

One red top: modified!

I am so very pleased!  I altered a red top that I had for some years and I still love, love, love the colour, but the fit is much too tight over the bust and I got bored with the overall look.

My good friend Tash unwittingly gave me a great design idea.  She was going to use a scallop hem tutorial and this made me think about what other shapes you could do.

This top makes a great project to try out my shaped hem idea. If it works then great, but if it doesn't then I can either chop off the hem and straighten it back out, or just let this go.

It worked out well!

This is what I started with:


It was only when I looked that I realised that I already had to do a repair job on the top of the side seams.  I hadn't worn this in a while so I didn't recall that there were holes, - and my hand sewing wasn't all that great either:


I machine basted the hem to turn out and press (I pressed to the inside first but realised that this wouldn't work. Lucky escape!).  Then I drew the pattern on and started to v-e-r-y slowly stitch it. It wasn't as easy as I expected:


My shape is a bit overly complex.  But I like it a lot.

I then turned this inside out and prodded and poked until all the little corners and peaks looked okay.  Again not as easy as I blithely assumed:  my scissor tip method did end in a couple of frayed tread ends poking through.  I ruthlessly cut those off.  This isn't a high value item - I just want to enjoy it while it lasts.


Then I edge-stitched this to retain the shape when I wash this next time:

No idea why this is upside down

I also ripped the long sleeves out and inserts wedge shaped gussets into the top of the side seams. This way I could make the top big enough to fit at the bust, and it also had the added advantage of getting rid of those pesky holes. Win-win!

I scooped the armholes out a bit to make a pleasing shape.  That ended up being a bit of a problem: the armholes probably gaped before but this emphasises it.  So I sewed bust darts in, longer ones at first but these looked awful, then shorter ones.  I am still not over the moon with this area, but I think top is wearable.
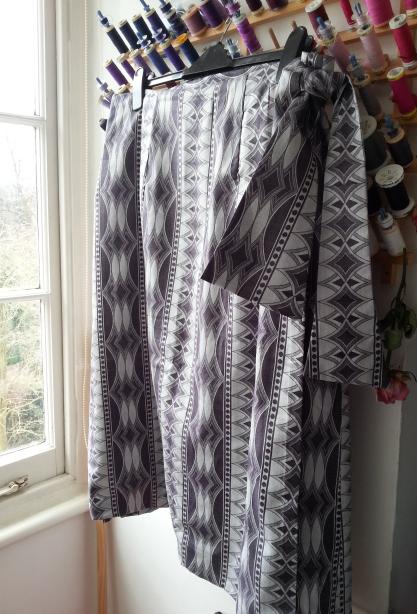
Here it is:


I think this is a successful project that I hope to get lots of wear out of in the summer!

Thank you Tash for the inspiration!

Monday 6 March 2017

UFOs finally finished

I finished two different UFOs in the last couple of days!

I am utterly delighted.

So I knew I was going to post about these two and only had a look through my blog to check what other completed project I blogged about in the last few months.  It seems that I say quite a bit about the process of sewing and ongoing projects, - but not as much about those that I finished?!

How odd is that?

I'll need to go through my completely items and blog about them soon.  Or update my blog about what project I got stuck on and why.  Plenty of material in both these categories.


So here is my silver grey wrap skirt that took me years to get done.

The problem is that this is only the 8th project since I started sewing again after a long gap.  This was a good 5-6 years ago.  I am up to 67 projects now, so it really has been a while.

Which is probably the explanation for why I went wrong with this skirt: I thought a nice bright pink lining was a great contrast to this grey fabric, - and I do love the combination.  Unfortunatley I chose a satin like material that's much too thick for the fabric weight.  I'm not so sure that this will be good to wear.

I am really happy with the shaped ties that I came up with.  The whole skirt is self-drafted - the idea was that a wrap skirt would fit me easier even if my weight goes up and down.


This teal coloured Lekala blouse ran into a huge problem.  The website made this look like a great standard long-sleeved blouse pattern, - except it was listed under 'stretch' fabrics?

Sorry, what?

It has bust darts, a button front and sleeve plackets and cuffs.  All hallmarks of a pattern for woven fabrics and the opposite of what you find in jersey fabric patterns.  Really odd.

Then it turns out that the fit would have been perfect if I were to put a zip in instead of buttons - there is no overlap.  I solved this by sewing a gape guard behind one of the fronts, attached buttons to this seamline and thread button loops on the edge of the other front.  Not ideal though.

Here is the graphic from the Lekala site:

It does look like a great pattern, but the lapels are very, very small.  That makes me think that the pattern was incorrectly drawn without the overlap needed.  It's easy enough to fix so I might make this again in future.  Not in a polycotton though, the sleeves wouldn't go in without puckering.

What I got stuck on was the sleeve plackets that I wanted to put in.  They turned out awful.  I must made a few mistakes cutting out the placket pieces and then couldn't overcome my revulsion at having to fix it.  It just wasn't happening and I'd rather not have this hang around for a few more years.  It's been too long and it was too difficult.  Plus I had to chop off quite a bit of the length because that looked awful on me too.

So today I chopped off the sleeves and made it into a short-sleeved blouse.  It was the quick-fix-solution that I needed.  So there.  Done.

I might now give it away to a charity shop because I am fed up with the thing.


Here's the better news:

Not a long-time UFO, this is a current sewing project that I am delighted to also have finished (SP64).  I also started another skirt, in a reddish-pink heathery wool fabric (SP67), where I only need to deal with the lining then this will be done too.

This isn't as A-line as it looks lying flat.  It is much more straight on me when I wear it - funnily enough.  I really must get someone to take a photo of me in this.

SP stands for sewing project.

So onwards and everything!

Happy sewing.