Saturday 30 November 2013

Grey socks


While I'm at it: I also started socks - for my dad, as a Christmas present.

I guess I'm blogging about it so that I can't back out of making these for him for Christmas.

This is a bit of a promisary note.

You gotta use every trick in the book to motivate yourself!

On the other hand the red jumper (and no, it's not a Christmas jumper, it's just not) will be finished soon and then I want another project I can quickly pull out and get knitting, round and round and round, while I watch television or something on the Internet.

The plan is to make this plain vanilla socks: just stocking stitch and no pattern.  My dad will prefer it, I'm pretty sure of that.  He will also appreciate that he'll be able to throw these in the washing machine - I somehow can't see him doing any hand washing.  Not even of hand knitted socks.  I just don't.

But that means that they're wonderfully quick to make.

And I'm enjoying knitting these!

Invigoratingly red

I haven't worked much with yarn or fabric in red.  My favourite colours are pink, royal blue, aqua or turquoise, petrol, purple, black, grey, silver and white.  And true red - but it's very difficult to find.

But I suddenly had the urge to get a red yarn to start a jumper with.

This is the result, well I should say the work in progress:


Isn't this just wonderfully colourful?  I find it very good for the soul to knit in a colour that works as a pick-me-up, so stimulating, so invigorating.  I really feel like this colour provides an energy that is making me feel better in the grey, the darkness and the cold temperatures of November.

I am very glad that I started this project.

Pink progress


It's coming along nicely.  Look at that sheen.

The pattern is great: I like the darts shaping the shoulders as well as the lower part at the waistline that form this kind of "envelope" shape as it is referred to.

I am not so enamoured of the satin.  I pulled a thread near the bottom somewhere because a bit of rough finger nail got stuck on my precious toile.

I am just glad that this was always meant to be the toile.  It would be nice if I had the choice between them at the end (I need to get these two done by 13th December) but I will happily settle for one.

For this version I would still need to cover some buttons with this fabric and also do button holes, four of them.  This causes a great amount of anxiety in me: I am pretty terrified that I would completely mess up the whole thing if I tried to do that many button holes. Yikes.

Thinking about it: I'd rather start the bluey-green silk version and see how that goes.

Overall I have to say that it is interesting to work with this fabric and find how it works for me. Or doesn't.

I can see why designers will use satin for designs where a lot of pleats, creases and folds are shaping the design, much more so than seams and darts.  A seamline that's out by a tiny fragment of a millimeter can really affect the way the garment looks.

I don't know if I'll ever get good enough to be able to successfully work with satin.

The colour is gorgeous but it's darn difficult to cope with.


Sunday 24 November 2013

Slippery pink stuff, blurgh


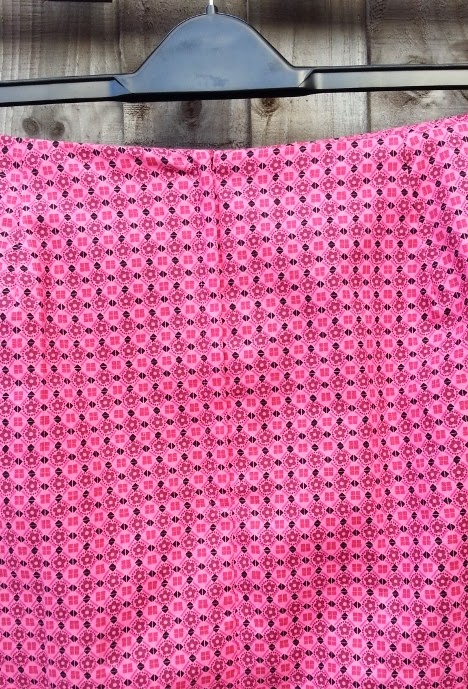
This is a rhetorical question: why did I ever think that working with slippery pink satin for my toile for the V8721 shrug was a good idea?

Oh yeah, I remember: I want this to be a wearable toile in case it works out. I'm absolutely sure that I'm not going to wear a toile made from faded, floppy sheeting but I can see myself wear something made out of this lovely pink fabric.

But oh boy, is it horrid to work with!

I had to re-cut one of the two big pieces because the lower layer of fabric slipped under the top layer.  The lesson from this is: use pins and not fabric weights on really slippery fabric - I had no idea how much a fabric like this can slide around while you're busy cutting it out.

And in case of any doubt: use at least twice the amount of pins you think you'll need!  If not more...

Horrid stuff.

But such a lovely colour!  And the sheen!

I might sing a different tune once I get this done, but for now I'm just not looking forward to the sewing part.  I can't help myself: I feel a headache coming on!


I bought this great book on garment construction.  The Fashion and Textile Museum in Bermondsey are selling an interesting collection of fashion design and pattern books.  I already own a few they sell so I didn't think I would be spending money when I went on Saturday.  Then I leafed through this one.  Must investigate further but it looks really good.  And useful!

We saw this exhibition at the FTM:


It was wonderful.  Very inspiring.
 
The first room, the Royal Room, was reserved for clothes made for and worn by royalty, in particular Princess Diana.  I was surprised to the see the apricot coloured Going Away dress she wore after her wedding.  I didn't like it very much, the chiffony bits were a bit much.
 
But right next to it was an aubergine evening gown that's utterly gorgeous! It had a very interesting folded and wound 'thing' going on at the bodice/neckline area.  I would have loved to see this better but the light was kept dimmed to protect the clothes.  Quite rightly.  This gown was my favourite in the room.
 
It was nice to see the sketches and then the dresses IRL.  Intriguing.
 
We were able to take pictures of the rest of the exhibit.  There were quite a few dresses in a very romantic vein - not really my cup of tea.  Some of the construction or embellishment techniques were interesting.  My favourites were the satin dresses that had pleating and folding: such wonderful shapes!
 
I was very intrigued by some of the seam lines on other dresses.  I must do a separate post on all those.
 
Loved it.

Sunday 17 November 2013

What Iffing

I love this blog post!  And I love her phrase 'what iffing' even more.  It is delightful and quite wonderful.  Exactly my cup of tea because that's how I think too.

The blogger is writing about the Vogue shrug pattern V8721 that I am interested in.  I love the way she discards the instructions when it doesn't make any sense to not sew the lower piece to the lining and then attach both to the rest (oh yes, so much easier) - and even better to eliminate a seam when you don't need that one either.

I am thinking of making this shrug myself:


I like how this apes the shape of a knitted shrug at the back and that the slot for the arm is horizontal.

I am thinking of changing the front centre though.  I want a shrug that exposes the lovely seed bead embroidery on my Christmas party dress, wearing this shrug with it just as it is would just show an expanse of plain velvet, nothing more.  That's not what I'm after.

I could keep either the top one or two buttons and then cut a sweep towards the hem or even towards the bottom of the side seam.  Well, where the side seam would be if it had a conventional side seam I should say.

Which means that I'm not just the person to discard nonsensical instructions, but the one who insists on messing up the design lines as well.

Well.

I guess the only way to find out whether this could work is to give it a try!

I can pop both the dress and a made-up muslin onto my dressmaking dummy and see how I need to draw this new edge to achieve the effect I want.  How hard can it be? (I'm already sure that that's got to be 'famous last words')


'What iffing'. I like that.

Saturday 16 November 2013

Pink summer skirt

I ordered this pink patterned cotton fabric online, for quilting.  But the colour is so very bright it doesn't go with anything else I've got.

What to do.  Make something else!

Like... maybe a skirt?

Good idea.  Here we go:


I'm really pleased how this came out. It's a length I like on me.  I tried to make this pattern before (my grey inverted pleat skirt) but messed up the pattern piece for the second version.  This is basically version number 3.


This is also my first lapped zip.  I had always tried to do invisible zips before, or whatever the technique was that I was going for.  I'm not really too sure about that point to be honest.

The idea was to do this type of zip in a workshop given by a friend of mine.  I ended up taking another fabric along to this. 

But my sewing machine manual gives detailed instructions on this kind of zip.  With plenty of graphics.  I like a good graphic or two (dozen), they're right up my street.

It went beautifully!


I am exceedingly happy with the evenness of the two halves of the back: to the left and to the right of the zip.  It is so easily done to have one side be higher than the other.  My solution to getting around this problem: I put the zip in first, and only then attached the two facings that fold inside.

The first facing is easy: plonk it in any which way you like.  The tricky one is obviously the second one.  I had pinned this and checked very carefully when I put the sewing machine needle down.  I'm sure I corrected the needle placement at least once before I ever started sewing.  You can also swivel things round if you feel like it when you have the needle in the fabric - so you can check a different angle, if you feel this helps.  Make sure you're happy with where this second seam is going to be, and you're good to go!

* * *

I have to say though that I cut the lining too small for the front and found that I couldn't attach it to the facings very well at all.  I ended up pushing this piece under the facing and sewing on the right side. Which would have been okay, except I attached it correctly at the bank.  There is some very unsightly bunching going on at the change from front to back.  I learnt something else: if you do a thing one way, don't suddenly go and do it a different way in another part of the garment when those two areas need to be attached to each other.
A-hum, okay.

* * *

I am already blogging about this though I still have to fix one issue. I twisted the bottom of the lining a bit and want to un-do that half. It shouldn't take long to do and it also looks done. So there.

Nice little summer skirt for next year.

Very happy.